been a while... again. sorry ;-)
so had a couple of request to explain how this was done, so here we go.
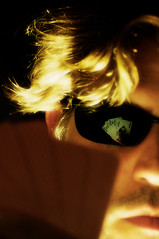
first things first, i pulled the royal flush out of my card deck. I then set up the camera about 3 feet in front of my face. i set the camera to manual focus and focused on a point in space 3 feet in front of the camera... this is where i would stand. i then tethered the camera to a laptop so i could see the results of the shots as i took the pictures. if you are unsure what tethering looks like, check my pic for day 9.
below me, at waist level, i set up a flood light and pointed it at the cards in my hand. i then proceeded to take several shots until i saw that the focus and positioning was correct.
i then went into photoshop and removed the reflection of the tripod, camera, etc. out of the reflection in my glasses by cloning them out. tweaked some of the color settings, cropped... and posted.
that's it... not too difficult ;-)
Friday, August 14, 2009
Sunday, June 21, 2009
171/365 - june is for jumping
another long delay between posts... so, uh, sorry!
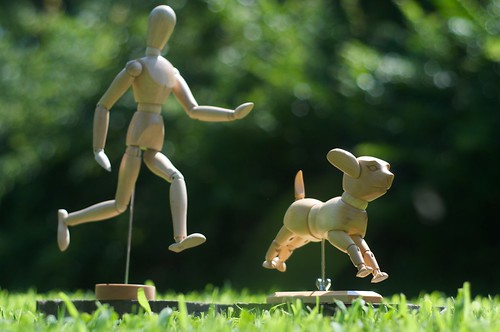

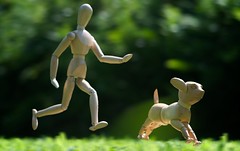
So, this is a composite of two photos. The key with taking this type of shot is planning out what you will be doing with photoshop before you start doing it. Here I took two shots, one with the props and the second without. both were take with the exact same camera settings, and from the exact same position. The Straight Out of the Camera shots are shown below.
The shot minus the props was used as a base layer in photoshop... And the important portion of the props were copied and pasted onto a layer above the base layer. I used the quick selection tool to select the props and refined the selection by adding a bit of a feather and expanding the selection a bit, so I could fine-tune once I got it into the main picture.
Once the dog and man were over top of the base picture I took the eraser tool and went around the edges of the dog and man in their layer to ensure that they looked ok together. then i applied a slight motion blur to the base layer to give a bit less of a static feeling...
and there you have it... a stick man and stick dog jumping... it's as simple as that ;-)
Sunday, May 31, 2009
150/365 - fireflies
it's been a while since i blogged about a photo i've taken, but this seemed like the perfect opportunity to start back up...
as summer approaches in my neck of the woods my yard gets filled up with fireflies. The spectacle is kinda magical, and i wanted to try and capture that a bit for this photo.
So, I took 88 photos. which may seem like overkill to most of you, but here is why approached the shot this way.
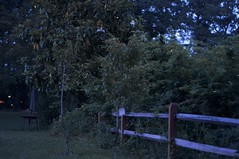
I wanted to open up the aperture wide open (1.8) so I could capture as much of the flashes of light from the fireflies as possible. But with the aperture wide open I couldn't keep the exposure open very long without completely overexposing the shot. So to compensate for this issue, I took one base shot at 8 seconds f/1.8 (which is the picture that allows you to see the fence, tree, etc). next i took 87 shots at f/1.8 and 3 seconds... these are the shots that capture the fireflies.
I then imported the 88 shots into photoshop as a stack, and then set the stack mode to "Maximum". This would combine all the pictures by showing the brightest pixel available for that location in any of the 88 shots. And that is how I got the fireflies to show up.
The process takes a while (about 2 hours of processing tim on the mac), but at the end of the process, it worked out ok ;-)
as summer approaches in my neck of the woods my yard gets filled up with fireflies. The spectacle is kinda magical, and i wanted to try and capture that a bit for this photo.
So, I took 88 photos. which may seem like overkill to most of you, but here is why approached the shot this way.
I wanted to open up the aperture wide open (1.8) so I could capture as much of the flashes of light from the fireflies as possible. But with the aperture wide open I couldn't keep the exposure open very long without completely overexposing the shot. So to compensate for this issue, I took one base shot at 8 seconds f/1.8 (which is the picture that allows you to see the fence, tree, etc). next i took 87 shots at f/1.8 and 3 seconds... these are the shots that capture the fireflies.
I then imported the 88 shots into photoshop as a stack, and then set the stack mode to "Maximum". This would combine all the pictures by showing the brightest pixel available for that location in any of the 88 shots. And that is how I got the fireflies to show up.
The process takes a while (about 2 hours of processing tim on the mac), but at the end of the process, it worked out ok ;-)
Friday, May 1, 2009
121/365 - A Walk To The Back
121/365 - A Walk To The Back
Originally uploaded by ddiemont
So, first things first, you need a lot of pictures... this is a combination of 883 pics at 12 pics/sec... So, I set my camera up to take a burst rate of about 3 frames per second and set it to the lowest resolution JPG it could take (no need for super high res RAW here)... Then I set a low aperture f/4 and focused to infinity (while setting the focus mode to manual).
The camera was then set to aperture priority (so it could adjust the shutter speed on the fly) and then i held down the shutter and started walking... my buffer will allow me to take about 130 shots or so before i had to stop for a moment.
Once I had gotten all the shots I then headed into the house and then imported the images as an image sequence in quicktime pro (Open > Image Sequence)... here you just navigate to the first image in the sequence and the rest will be imported in in order.
I then exported the movie and used iMovie to add some Muzaak and a little subtitle... and that's was it ;-)
Well, I'm off to pack for vacation. Thanks for stopping by ;-)
Thursday, April 23, 2009
113/365 - beer and wings
for those who haven't followed my antics, I'm a HUGE Red Wings Fan (actually, I'm a huge Detroit Sports Fan)... so tonight was the Detroit Red Wings 4th game of the playoffs and since I was headed out to have some drink while watching the game decided to take a shot of some "Wings and Beer" (obviously a play on buffalo wings and beer... yum).
So, first things first, take shots... i poured a glass of beer and got several shots of it in various states of beer headedness... for this shot i used one with no foam for the base layer and second shot take a few seconds earlier with a thin coating of head on the beer...
Now, open both those shots in photoshop and place the no foam version at the bottom layer... then i went online and found a red wings logo and imported that into the composition in it's own layer...
so, at this point i have 3 layers
- red wings logo on top
- beer with a lot of foam on the layer below that
- beer with little foam on the bottom later
ok, now select the logo and use the distortion feature (in photoshop it is under "Edit > Transform > Distort" to distort the perspective of the logo such that it appears as though it is laying atop the beer.

ok, now we've got the elements laid out the way we want them, we just want to get rid of that wacky looking logo atop the beer... so with that layer selected we do a color range selection (luckily the red wings logo is only red)... in photoshop it is "Select > Color Range..." this allows us to choose the red portions of the image... which essentially is the red wings logo. when in the color selection tool select the red from the image and adjust the fuzziness such that the logo is highlighted and not much else... then click ok and now you have your selection.
so, now we have the logo selected, it's time to start erasing some beer head... select your second layer and now your selection is going to apply to that layer... next i selected the eraser tool and set the opacity to about 20% and erased the entire logo...
The next thing i did was select the selection tool again and then open the "Refine Edges Dialog" and decreased the size of the selection by contracting it to about -30 or so... then selected the eraser tool, changed the opacity to about 70% and erased some the entire selected area...
saved and re-imported into aperture and added the vignette and did some work with levels (obviously i could have done this in CS3, but i've got a workflow in Aperture that I am MUCH faster with, so that is what I tend to work with for things that i know)...
and that's about it... sounds kind of intensive, but it really only took about 10 minutes to put all the pieces together. just took a bit of planning ahead of time and knowing exactly what i wanted to do ;-)
thanks for stopping by...
4 games down, 12 to go.
-Derrick
Sunday, April 19, 2009
107/365 - the colors of spring
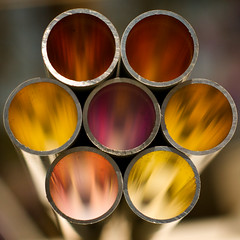
blah So early yesterday i was contemplating what my shot of the day was going to be... well, i picked up some metal pipes that were laying around my house in thoughts that i could build myself a new ghetto lightbox with them... well, didn't have enough pipe to make the lightbox, but I decided to pick them up and look through them. I can't quite tell you why I did, just an accident I suppose, but as I looked through the pipes I notices that the light refracted through each of the pipes differently when pointed at the same item.
So, now I had my photo idea for the day, I just needed to execute. So I took a couple of rubber bands and strapped the 6 pipes together and went outside to start looking through them for some cool colors. I eventually ended up in front of some Wisteria and found the colors to be perfect. I set the pipes up on the boat in the yard and started shooting (see picture below).
Just in case you are looking to reproduce, the pipes were about 1" in diameter and about 2 feet long. I'm not quite sure what they are from though...
So that's about it. nothing terribly special, just some pretty colors ;-)
Thanks for stopping by
-Derrick
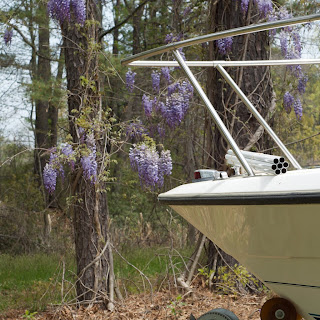

Saturday, April 11, 2009
101/365 - the escape plan
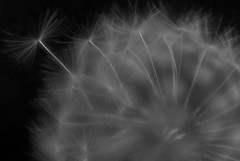
It's been a while and I'm back!!! So today we are going to discuss how to do a ghetto macro lens. Be forewarned... this is crazy... I am a professional driver on a closed course ;-)
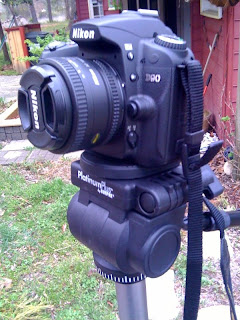
This is pretty simple stuff, but a real pain without the proper equipment (which i do not have). Basically what you are going to want to do is to take your camera, mount it on a tripod (for some semblance of steadiness) and then mount your 50mm lens onto the camera backwards... well, that is if you have a reversing ring, for nikon's it is a BR-2A, this is an accessory that will allow you to mount your 50mm lens backwards onto your camera, effectively turning it into a macro lens... I, in this case, just held the lens in front of the camera... truly ghetto.
so there must be a catch right??? otherwise no one would ever buy a macro lens. well, there are several catches... this is a completely manual solution, so a lot of trial and error will be part of your photo shoot. this is because your camera can't meter without a lens attached (and essentially you aren't mounting the lens... even with the Br-2A). So you will have to adjust the iso, shutter speed and aperture manually). there doesn't appear to be a way to adjust the focus when the camera is reverse mounted as well, so you will have to move the camera to adjust for this.
So, what I did for this shot was reversed the 50mm, and then started shooting the dandelion which was taped to a piece of black posterboard... bumped up the iso to 800 to allow for a faster shutter speed and then took about 10 shots with the timer shooting mode so i could get as steady as possible. then brought the shot into aperture and cropped slightly, adjusted the exposure, and then converted to monochrome using the green filter.
that's it... so what did i learn??? i learned it is time to get a real macro lens. i really like getting up close to items and this allows you to do just that. so i think know what my next photo purchase will be ;-)
thanks for stopping by.
-derrick
before flipping the lens:
after flipping the lens:
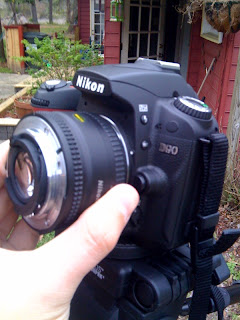
This is pretty simple stuff, but a real pain without the proper equipment (which i do not have). Basically what you are going to want to do is to take your camera, mount it on a tripod (for some semblance of steadiness) and then mount your 50mm lens onto the camera backwards... well, that is if you have a reversing ring, for nikon's it is a BR-2A, this is an accessory that will allow you to mount your 50mm lens backwards onto your camera, effectively turning it into a macro lens... I, in this case, just held the lens in front of the camera... truly ghetto.
so there must be a catch right??? otherwise no one would ever buy a macro lens. well, there are several catches... this is a completely manual solution, so a lot of trial and error will be part of your photo shoot. this is because your camera can't meter without a lens attached (and essentially you aren't mounting the lens... even with the Br-2A). So you will have to adjust the iso, shutter speed and aperture manually). there doesn't appear to be a way to adjust the focus when the camera is reverse mounted as well, so you will have to move the camera to adjust for this.
So, what I did for this shot was reversed the 50mm, and then started shooting the dandelion which was taped to a piece of black posterboard... bumped up the iso to 800 to allow for a faster shutter speed and then took about 10 shots with the timer shooting mode so i could get as steady as possible. then brought the shot into aperture and cropped slightly, adjusted the exposure, and then converted to monochrome using the green filter.
that's it... so what did i learn??? i learned it is time to get a real macro lens. i really like getting up close to items and this allows you to do just that. so i think know what my next photo purchase will be ;-)
thanks for stopping by.
-derrick
before flipping the lens:

after flipping the lens:

Friday, March 27, 2009
86/365 - Escher No. 2
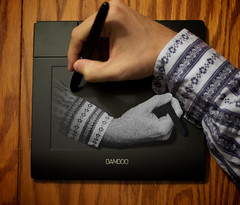
So this was my second attempt at recreating a M.C. Escher classic. I was always drawn to his art as a child because his art involved math and I was very into math as a child as well... Add to that the fact that he is Dutch and I'm part Dutch, and you've got a winning combination.
So last night I picked up one of these Bamboo Tablets and it seemed like the perfect subject for this type of shot. I wanted to replicate Escher's famous drawing of a hand drawing a hand, which is drawing the hand that is drawing it... and hold up, i'm getting confused.
So here is how this one is accomplished. This is essentially a combination of 2 shots... the background image is of the Bamboo tablet with me drawing on it. The second shot I used was of my hand over a piece of black poster board in the exact opposite direction... if you really wanted to I suppose you could use the same shot as the original, rotate it 180 degrees, but then your lighting is going to be WAYYY off. (well, 180 degrees off).
So now you have the 2 pics to bring into photoshop. (well i brought them into aperture first to correct some white balance issues, etc.) So as the background layer I use the bamboo shot. Next I copied the hand from the other shot (using the quick selection tool and some edge refinement) and I pasted that into its own layer in the bamboo shot.... Next I transformed the hand that would be coming out of the bamboo such that it was the proper size and rotation and positioned properly.
Next I took the eraser tool, and erased off the excess pieces of my arm in the arm/hand only shot, such that it ended just before the edge of the tablet's "active area". Once this was done I took the brush tool, turned the opacity to 50, gave it a pretty low hardness value and created a shadow under my arm and hand. I mad the shadow come out a little more the further I got to the right to give a greater sense of depth.
Next I created a gradient mask over my arm so it disappeared into tablet (while on the layer, choose the add a mask and create a gradient on that layer which fades from the start of the shadow area to the edge of the pad.
next I took the Pen tip in the Bamboo shot and copied and pasted into a new top level layer. this way the pen tip on the regular shot appears to be on top of the "drawing of my arm"
and finally, take the arm/hand layer and apply a "reticulation" filter to it. This is what gives the arm coming out of the tablet a "pointillism" feel... which is a nod to m.c. escher.
thanks for stoppin by,
Derrick
83/365 - the diver
so there goes one perfectly good piece of posterboard...
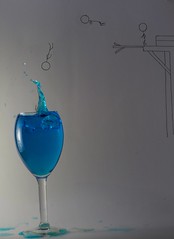
the original idea for this shot was that it was going to be a diptych (or maybe more than 2 shots) to shot the diver jumping off the diving board and into the cup of water. in the end i felt like it worked pretty well as a single shot... so here is how it's done.
First things first... draw all the background elements onto your ghetto lightbox (don't sweat it, posterboard is like $0.79). i would suggest drawing in pencil first and then going over top of that with a sharpie or something dark.
now it's time to light up your lightbox and take your first shot. better throw the cam on a tripod and trigger with a remote at this point because we want minimal movement between the shots... my first shot was set at f/14, 1/6sec exposure at 200 ISO (all shots were taken with my 50mm lens). The main purpose of this shot is to get the stick man's image as he is diving into the water...
The second shot is same type shot, but now with the glass of water in place (water had 2 drops of food coloring in it for dramatic effect). same camera settings for this shot as the last one, focused on the rim of the glass this time.
Now it's time to start droping objects into the water for the splash... this is a combination of camera settings, timing, and luck. The camera settings for this shot were (f/2, 1/800sec, ISO 640). Then I started dropping coins into the water and getting shots... the 6th or 7th shot turned out the best (hence the puddles of blue water on the base of the posterboard).
Now, clean up the mess you've made and head over to the computer. I imported the shots into Aperture and adjusted white balance and exposure such that the shots matched. I then exported the three shots into photoshop. The base layer being drawings along, the next being the glass sans splash, and the top layer being the splash. I made sure all the shots were lined up properly and then started doing some erasing. If I knew then what I know now, I would have probably tried to accomplish this with masks... I made sure to put a bit of a soft edge on the eraser so that it wouldn't look to harsh in the transition areas.
once i had everything looking ok, i did some blurring on the diving board to give it a sense of motion... then brought the shot back into aperture for some final touch up work, then posted to fickr... so there ya go... not so bad, just takes a bit o' planning ;-)
thanks for stopping by,
Derrick
Saturday, March 14, 2009
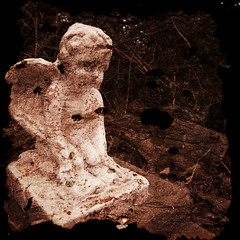
73/365 - angel
ok, so i've been seeing a bunch of photos recently that have textures applied... and i wanted to give one a try... but, i didn't really want to go scrounging the internets for a texture... i wanted to make my own ;-)
so first things first, we need a photo to lay the texture onto. So I went out into the yard and grabbed a shot of a little angel statue that we have laying out in the pathway in the backyard. I felt this would work out well just because the paint on the angel statue is flaking off giving it a decaying look already... and i felt the texture i would be adding would add to this look.
I imported the shot into Aperture and cropped and made some small color adjustments.

Next I needed a texture. So, I took a piece of tissue paper that I had bought for my "ghetto lightbox" and rolled it up and burnt the edges off... then i rolled in the other direction and did the same thing. now i scrunched up the tissue paper and burnt sections... this gave it some holes in the middle of the paper, plus a real rough look. Once I opened up the tissue paper i burned a few more sections of the paper to make sure there weren't sections of the paper that were completely void of burns, then i laid the sheet out flat on a piece of black poster board and took a shot of the burned tissue paper.
I then imported that into Aperture and adjusted the black point such that the black poster board became completely black.

OK, so now we have an image... we have a texture... time to put them together.
Open up your base image in Photoshop (in this case, it is the angel) and then open up your texture image. Select all of the texture image and copy it to the clipboard. Now go back to the base image and create a new layer. Paste your texture onto this layer, then go to the free transform (in the edit menu) and then resize your texture image to lay over the complete base image (you should now not be able to see the base image).
Now, in the layer properties, choose to change the layer from "Normal" to "Overlay" (or soft light, or hard light, or whatever... time for you to experiment). In this case I did the Overlay and then i duplicated the layer to intensify the effect...
and that's it. That all it took (it's fairly easy, regardless of how difficult i may have made it sound).
Enjoy workin' with textures. (and make sure to go to this tutorial by aknacer. for the vid that showed me how to accomplish this).
Have a great weekend!
Friday, March 13, 2009
72/365 - stuck inside the color wheel
Pretty simple picture to do, provided you have the right tools (or is that toys)...
Step One: Create a blank picture in a some image editing software.
Step Two: Create a colorful gradient fill in that image.
Step Three: This is where the toys come in handy... hook your computer to a projector and display your picture full screen.
Step Four: A wide angle lens is helpful because you want to set the camera up close to the screen and fill as much of the frame with the color gradient as possible.
Step Five: Time to take the photo... stand between the camera and the projector to project your shadow onto the screen, then take the picture with a delayed timer (you want your hands in the shot, don't ya?)
Step Six: In your fave editing software crop out the excess and angles that will be introduced due to you not necessarily filling the frame.
Step Seven: Bask in the glory that is your photo!!!
Monday, March 9, 2009
The Quest for the Blue Heron and/or Crane Shot

As some of you have been keeping up with me on my flickr page may have noticed as of recently, I have become obsessed with getting a shot of a crane that has taken up residence on the creek that runs behind my house... luckily for me, my neighbor caught this slightly embarassing obsession on camera...
 I was sitting on the pictured ladder for about 45 minutes trying to get a shot of one of the Blue Herons that were hanging out on the creek flying towards me... got a couple shots of some Canadian Geese, but that was about as good as it got this evening... I shall get a shot of one of those cranes (not pictured) before the end of the year... that is my promise to you!!!
Thursday, March 5, 2009
64/365 - trapped
fairly quick little blog entry here...
the shot of me pressed up against the screen of the mac was actually taken of me pressed up the screen of my hummer... used a circular polarizer to lower the glare a bit and a black jacket was held up behind the camera to reduce glare more. triggered the shot with remote.
then brought the picture into apple aperture, enlarged to full screen mode, then took second shot of me trapped in the macbook.
changed to monochrome due to the multiple white balances that were causing issues (if i white balanced for the laptop i was BLUER than the Cookie Monster; if i white balanced for the me, the macbook was a dingy yellow.) oh well.
Friday, February 27, 2009
58/365 - been draggin' around
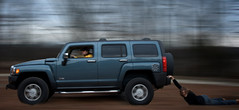
OK, a little something different today as for the next few days I may be posting my daily pictures from the indoors (we've got a couple days of rain and... fingers crossed... snow headed our way. As you can see the concept for this photo was to have an evil me pulling a not so evil me (or possibly a second evil me) behind the hummer. Not exactly sure why I came up with the idea... I did want to try out the radial blur feature in photoshop. I had a photo of the day a few weeks ago which I wish I had photoshop for to add some radial spin to the wheels of a toy car. So, heres how I worked today's photo.
Step 1: Took a photo of an area of my backyard without the hummer in it. Then I added a horizontal motion blur to that photo.

Step 2: OK, now I took a picture of the hummer with me driving it (obviously) and pasted that over top of the blurred background.

Step 3: Now I took the undergrowth below the hummer, the background behind me in the car and did a motion blur on those sections. Then I ran a radial blur on both wheels.

Step 4: Next I took a third picture of me being "dragged" by the hummer and pasted that into the photo.

Step 5: Now I did a blur on the lower portion of my body so that it wouldn't be such a sharp contrast between the bottom of my body and the ground... then I did a small amount of horizontal motion blur on the hummer and me (5 pixels worth or so).

Step 6: Then I darkened up the background layer a bit in layers to make it match the hummer and I. The final product on flickr has some cropping and a small amount of vignetting applied as well.

Hope you enjoyed.
Have a great weekend
-Derrick
Wednesday, February 25, 2009
56/365 - Mr. Lucky Starlight
Well, sorry it's been a while since my last post. Didn't really think there was anything that was technically very hard over the last few weeks (although I may go back and post about my layered shot a few days ago... "Wish I Was Here"
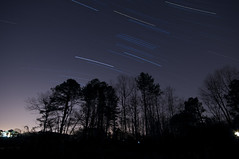
So, the reason this shot is called "Mr. Lucky Starlight" is because this is a series of exposures (as was recommended by flickr user clay.wells... The Mr. Lucky is referring to the album I was listening to as I was taking the exposures... and it played a somewhat important part in the photo taking process... it is how I timed out the exposures. I took on photo per song. Ended up taking 24 pics for this, each around 4 or 5 minutes.
Well, that presents a bit of an issue because the exposures become slightly whacked out. So I imported all the images into Apple Aperture and adjusted the histograms on each of the exposures to approximately match. Then I matched the white balance and then exported the files out as jpgs.
Now I imported the files into Photoshop using the "Import photos as stack" option. I selected create as smart layers (and I did not automatically align as they were taken on a tripod and didn't have much variation)... Once I got them imported in I set the Layer Stack Mode to Maximum...
and there you have it.
Mr. Lucky Starlight.
thanks for stopping by.
-Derrick
Wednesday, February 18, 2009
49/365 - waiting
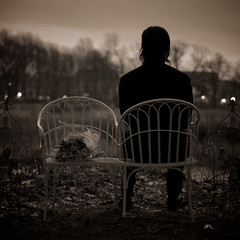
what i wanted to create was a photo that could be interpreted as either sad or happy... is the subject waiting merely for someone to show up (an early arrival perhaps), or is he waiting for someone that is to never show... part of the reason that the subject is aimed away from the camera is to hide any sort of emotion... the all black clothing is there to increase the feeling that this is just a silhouette.
maybe not the best art style photo, but give me some time... i may get better.
So, this photo was taken with the Nikon D90, ISO 200, f/2, 1/13 sec. Brought the photo into Apple Aperture to work with the photo. Cropped to square to remove trees on the right hand side of the frame. Made some tweaks to the exposure (bought it up just a tad), changed to a monochrome image using the orange filter option, then converted to a color monochrome using 60% intensity with a brown color. Then cloned out a power wire that was in the distance and there you have it...
waiting
thanks for stopping by.
- derrick

Saturday, February 14, 2009
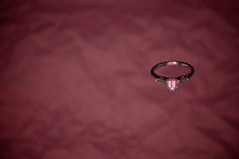
45/365 - the ring
Its a special Valentine's Day post in my blog!!!

Today's photo, in theory, didn't seem so difficult. About 2 hours of shooting later I discovered that I was being much more ambitious with my photo than even I could have anticipated.
Before we get into the setup of the photo, just a little information on the subject of the picture. I was engaged a few years ago and luckily I called the whole thing off a few months before the wedding... We weren't spiritually compatible, and it was going to be a rough go of it had we gone through with it... and over time i've come to realize that the differences were more than spiritual... so there's that. But, on the bright side... I did my ring back! And I have always liked this ring... I like the symmetry of it.
*** the shoot ***
the original idea was to have the ring falling and to capture a picture of it in mid-fall. challenging, but I thought it was doable... I took about 170 pics of this, with varying levels of success... Regardless of the settings that I made within the camera I wasn't able to get a clear picture of ring at the right angle.
So, onto the backup plan.
to recreate you will need:
- a ghetto lightbox
- some pink tissue paper
- something to cover the sides of your ghetto lightbox (i used a towel for maximum ghetto-ness)
- a ring (you're gonna have to get your own... unless you are female, single, and play your cards right)
- some string to magically suspend your ring in mid-air
- a candle to light your ring with (and if you are lucky, not catch the tissue paper on fire with)
- a tripod
- a camera (unless you are a fantastic painter)
Once you have tied the string to your ring and taped it to the top of your lightbox to suspend it in mid-air, set your camera up to a long exposure (cause it's dark in there) and then light your candle underneath the ring to light it up. now take some pics. i used a long lens so i could get some distance from the ring (250mm) and the shutter speed that i used was 1 second. Also bumped the ISO down to 100 to allow for the longer exposure... and the aperture is set to f/5.6
once i got the photo into aperture, I took the saturation down a notch (the hot pink was a little too hot), vignetted (as always), and adjusted the levels on the photo so as to get the proper mood.
so there ya go...
happy valentine's day
-derrick

See - i told you it was a ghetto lightbox ;-)
Thursday, February 12, 2009
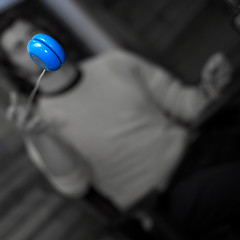
43/365 - there's no fun and games at the bar
lucky for me, when i got home i saw this yo-yo sitting on my counter, just waiting for me to pick it up and start flinging it around. Done and Done.
every once in a while I will see a selective color photo on flickr that I really dig (like this one i found this week) and i really want to try it... but i don't have the sexy legs... what's a boy like me to do...
YO-YO
So, here's how it was done:
obviously the tripod was mounted at an angle... this is where it pays to have at least a decent tripod that won't buckle under the pressure of the weight of the Nikon D90 and the Flash (SB-600) attached... Then i got the focus of an item placed at the approximate area where the yo-yo would be at full extension when thrown and once that was done I put the camera into manual focus mode (i'm gonna wear out that switch).
The camera was set at the fastest possible shutter speed for the flash to shoot off at (1/200th of a second), i set the camera to fire with remote, then I went over to the bar and started slinging. After a few minutes of yo-yo tossing I had some shots that could work for me.
Then I brought into Apple Aperture (currently my post-production weapon of choice) and then dropped the saturation on all color channels except for the blue ones (all my clothes were neutral colors)... a little vignetting and levels play later and I was ready to push the pic up to flickr. it was a simple as that ;-)
thanks for stopping by
-derrick
Wednesday, February 11, 2009
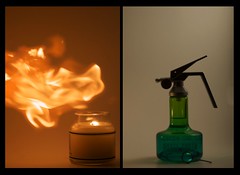
42/365 - diesel bomb
this was an accident... i swear!!!

So, for some reason on the way home from work I bailed on what my original plan for tonight's photo was going to be. I would spill the beans on what it was, but I'll come back to it once i have a wider lens, which will make that idea more effective.
So, while stopped in traffic I decided to get online with my iPhone and do a little research into how much a lightbox might cost me and where I might go about picking one up... Well, lucky for me I came across a nice little blog post on Strobist detailing how to make a "do it yourself" lightbox... sounded like a good idea, cheap, and i want to be able to do cool lightbox photos like this (simplicity roxx).
So, the original idea was similar to this photo... EXCEPT instead of the flames, I was going to have the mist from the perfume spraying out of the bottle... the plan was to photoshop 2 pics together to make it appear that the perfume was essentially spraying itself. Great Idea, except I couldn't get the droplets to show up in any way, shape, or form!!! well, here is where the candle comes into the game. all i really wanted was a little something to give a different refraction to the mist, making it show up a little more. Well, I was a little worried about it catching fire, and so I went outside and ran a few test "shots" of the cologne over the candle... and no flames... so, thought it was all good to come in and start shooting...
First shot of the cologne over the candle and BOOM (not noisy, but visually pretty cool). Since I built the lightbox pretty big, the flames didn't get too close to the walls, and then i set off trying to capture the flames... with one hand I was shooting off rapid fire shots on the camera and the other I was pumping the cologne... after about 80 shots I had a few that had some flames that I liked.
a very small amount of post processing later, I had me a nice little diptych (2 pics in this sense are better than 1... at least more exciting)
apologize the last blog was so darn technical... i'll do my best to keep the technicalities down to a minimum in future posts!
thanks for stopping by.
Derrick

Monday, February 9, 2009
40/365 - self portrait - m.c.escher style
sometimes i get an idea in my head... and i'm gonna execute it no matter what... and this was actually last evening's crazy idea which got postponed one day due to some extremely nice weather on Sunday ;-)
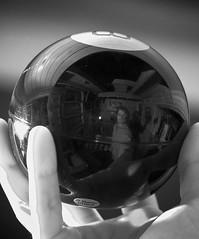
The inspiration for this is m. c. escher's self portrait. I've always admired escher's work partially because he used a lot of math in his work, and as a kid I was REALLY into math. that kind of wore off, except for I still love to problem solve...
So, this shot was successful after about 40 or 50 takes. basically what I have done is tethered the camera to my laptop, then set an SB-600 flash off the camera aimed at me (so I would be properly lit for the shot). Next I set the camera on a tripod and aimed and focused on a point in space... then set to manual, so that focal point would not be lost. Now, I set the ISO to 1600. It's kind of dark in this room, and I really wanted to control where the light was coming from in the image. Now I lit the bar area softly, set the flash mode on the D90 to Commander mode, then set it's output to 1/128th power (would have prefered no flash at all, but the camera did not seem to want to cooperate). Then i pulled out my trusty remote and just started clicking away, checking the laptop after every exposure to see how I needed to compensate for the next shot (the lens is zoomed to 140mm, and the 8-ball nearly filled the frame, so the slightest movement and I was doomed).
then click, click, click, click, click, rest my arm, click click, click, click... and BAM i got the shot i kinda sorta wanted.
maybe something easier tomorrow evening.
Friday, February 6, 2009
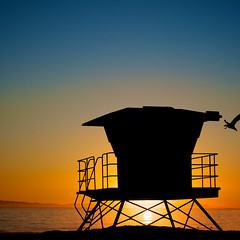
fly away sunset
i generally resist the urge to go overboard with the saturation. not my style... but sometimes i'm ok with it, and i suppose this is one of those times.
can you tell by my indecisiveness how i really feel about it?
this is of a lifeguard station in huntington beach, and for a slight challenge I decided to go onto the beach armed only with the 50mm f/1.8... lesson learned: didn't do the math on how much walking i was gonna have to do to frame shots properly. but, that's fine as i do like the results of the outing... some great DOF in some portraits i took of the family.
with this photo in aperture i cropped to square leaving the lifeguard post in the lower half of the photo, leaving the sky to fill the rest of the frame. then vignette and saturated... also dropped the exposure level a bit to drop any detail from the lifeguard post into the shadow.
hope you like ;-)
thanks for stopping by.
-derrick
Thursday, February 5, 2009
36/365 - the night falls upon my home
night shooting... deserves a quiet night...
R.E.M. once said something similar. Well, it's been cold around here lately (minus the benefit of any snow) so i've been more of a shut in than normal... i want to get out to some of the local places in the next few months to shoot, but right now i'm confined to my place, so trying to think of some new ways to shoot the area.
so, this was attempt 3 of 3... glad it turned out, cause the battery drains pretty fast when you are doing some of these long exposures... For this shot I set up the camera just below the barn, propped it up and made the following settings on the D90:
Aperture: f/10 (for a decent depth of field, didn't want any of the barn to be really out of focus.
ISO:200 (the lower the noise, the better... and i'm not a huge fan of the noise reduction feature of thes cams, takes too long;-\)
shutter: bulb... started the exposure with a remote and got the heck inside... did i mention it was cold outside???
then about 20 minutes i came out and stopped the exposure and ran back in the house (again, did i mention it is cold?)
now for some post processing work... in aperture (love this program) i bumped up the saturation of the blues and pulled down the luminosity. cropped (can you tell this isn't a native resolution of the d90) and straightened out the picture (would have paid more attention as i was taking the picture, but did i mention it was cold???)
hope you gleaned a little info from this blog entry... if you're digging them let me know on the flickr page and I will make sure to keep them coming... love sharing these lessons learned with all my flickr friends.
-derrick
Tuesday, February 3, 2009
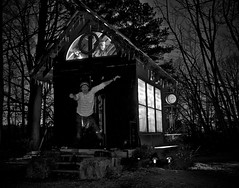
34/365 - ghost in the attic
ok, this was slightly more difficult than some that i've done over the past month... and i'm not 100% pleased with the final outcome... but i suppose I never really am 100% happy. i always see something i could fix or do better next time...
alright, 'nough bitchin...
so, i decided on this shot earlier today and decided that i didn't have a powerful enough flashlight (that worked) to be able to accomplish what i had in my head. so i headed down to lowes and picked up a 2 million candlelight power flashlight and came home to take the shot.
I had the camera tripod mounted and and started the shot with the remote. ran into the shed and covered the front door with a heavy blanket, then broke out the flashlight and started painting the windows. then i climbed up into the attic (no easy feat, mind you) and then did a couple of poses up there with the flashlight, to make me look like i was trying to get out through the attic.
now, climbed back down, did some more painting on the windows and then pulled the blanket off the door. now, i take off my heavy black jacket and run out the door, jump off the deck while stopping the exposure with my remote (check the right hand)... the rear flash freezes me in the frame.
now the downer part... the shed itself is underexposed like crazy... and there isn't much i can do about it... if i properly expose the shed with some spotlights in the first part of the shot, then i disappear into the shed when I am jumping out and the ghosts up top disappear... ugh.
learned a couple of lessons on this one... I hoped that I would not look like a ghost in the final image, but hey, whatever...
then i did some pretty heavy lifting in Apple Aperture (monochrome mixer, exposure adjusting, levels, shadows bumped up, vignetting added)
hope you enjoyed this installment.
the settings:
Nikon D90
Aperture: f/18
ISO: 200
Exposure: bulb... 410.9 seconds
Flash: SB-600, set to +2.7 exposure compensation
Monday, February 2, 2009
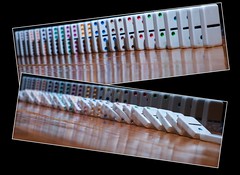
33/365 - d o m i n o s . . . they all fall down
ok, my first diptych... and i'm ok with it... i'm sure I'll try a more classic diptych sometime soon, but wanted to get an action shot of some dominos biting the dust... so here's how it was done...
like last night's photo the flash was off the camera... SB-600 held above the dominos. took an 8 second exposure at f/6.3, ISO 200 (base ISO on the d90)... shot off the flash one time. oh, and the room was pitch dark.
second shot has the same settings 8 seconds, f/6.3, but this time i shot off the flash once at the beginning of the frame, toppled the dominos, then shot off the flash again.
now, i imported the shots into Apple Aperture (along with about 30 other shots... failed attempts) and then cropped and created a "book" from the images. now, i removed all the pages except for one, and then added the photos to that page, and then rotated both and added a small frame... "published" the book to JPG and voila.
my first diptych.
2 photos that are better together than they are all alone. kinda like peanut butter and jelly. or rum and coke.
Sunday, February 1, 2009
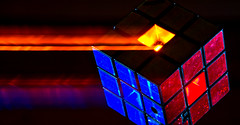
32/365 - Rubik's to the 3rd Power
My first post going over my photography... this is soooo exciting (ha ha). So here's how this was done...
I has the D90 on a tripod, and the rubik's revolution in a shot glass (I have plenty of those laying around)... I turned off all the lights in the room and started with the Rubik's Cube just out of frame. then i panned the camera during a 30 second exposure slowly to the left until i had the cube just out to the right hand side of the frame... pan stop!
Now, I moved over to the right hand side of the bar that I had the cube sitting on and took my SB-600 and flashed it... then i got over on the left hand side at approximately the same area and flashed again! and then waited for the exposure to end...
then in Apple Aperture I cropped the photo to make sure the cube was on the right side of the frame and the shot glass was copped out... boosted the Saturation (it's a toy, it should be saturated) and the definition (I wanted this thing to really look defined). then moved the black point such whatever was in the background completely dropped out...
and voila... Month 2 is off to a rousing start!
Welcome to the Blog
Welcome,
In October of 2007 I picked up my first Digital SLR (a nikon d40) and I fell in love with the hobby of photography almost immediately. I'm constantly trying to learn new techniques to make my photography more interesting and in this blog I intend on (a) going over some lessons learned, (b) tell some stories behind the photos, and (c) highlight some of my favorite photographers on flickr and what i feel are their best works. Thanks for stopping by, and I hope you enjoy.
My first "Explored" photo on flickr:
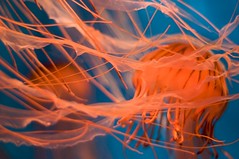
Subscribe to:
Posts (Atom)