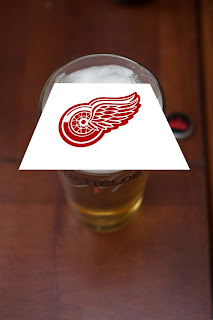
So, first things first, take shots... i poured a glass of beer and got several shots of it in various states of beer headedness... for this shot i used one with no foam for the base layer and second shot take a few seconds earlier with a thin coating of head on the beer...
Now, open both those shots in photoshop and place the no foam version at the bottom layer... then i went online and found a red wings logo and imported that into the composition in it's own layer...
so, at this point i have 3 layers
- red wings logo on top
- beer with a lot of foam on the layer below that
- beer with little foam on the bottom later
ok, now select the logo and use the distortion feature (in photoshop it is under "Edit > Transform > Distort" to distort the perspective of the logo such that it appears as though it is laying atop the beer.

ok, now we've got the elements laid out the way we want them, we just want to get rid of that wacky looking logo atop the beer... so with that layer selected we do a color range selection (luckily the red wings logo is only red)... in photoshop it is "Select > Color Range..." this allows us to choose the red portions of the image... which essentially is the red wings logo. when in the color selection tool select the red from the image and adjust the fuzziness such that the logo is highlighted and not much else... then click ok and now you have your selection.
so, now we have the logo selected, it's time to start erasing some beer head... select your second layer and now your selection is going to apply to that layer... next i selected the eraser tool and set the opacity to about 20% and erased the entire logo...
The next thing i did was select the selection tool again and then open the "Refine Edges Dialog" and decreased the size of the selection by contracting it to about -30 or so... then selected the eraser tool, changed the opacity to about 70% and erased some the entire selected area...
saved and re-imported into aperture and added the vignette and did some work with levels (obviously i could have done this in CS3, but i've got a workflow in Aperture that I am MUCH faster with, so that is what I tend to work with for things that i know)...
and that's about it... sounds kind of intensive, but it really only took about 10 minutes to put all the pieces together. just took a bit of planning ahead of time and knowing exactly what i wanted to do ;-)
thanks for stopping by...
4 games down, 12 to go.
-Derrick

Has anyone told you how awesome you are today?
ReplyDeleteIf not...consider yourself told!
You are awesome!!!!! :)
sheesh... it was 11:35 and i hadn't heard it yet... i was worried that i had turned the awesom corner onto loser Blvd...
ReplyDeleteGracias ;-)
:) Sabes castellano?.... otra de tus multiples facetas?.... This is intense! I think i hardly understood half of it... but I will play with cs3... and see if I can set a Star Wars logo some where!...:)
ReplyDeleteThanks for sharing!