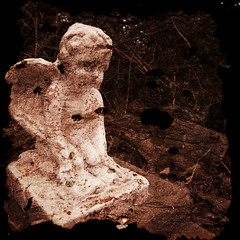
so first things first, we need a photo to lay the texture onto. So I went out into the yard and grabbed a shot of a little angel statue that we have laying out in the pathway in the backyard. I felt this would work out well just because the paint on the angel statue is flaking off giving it a decaying look already... and i felt the texture i would be adding would add to this look.
I imported the shot into Aperture and cropped and made some small color adjustments.

Next I needed a texture. So, I took a piece of tissue paper that I had bought for my "ghetto lightbox" and rolled it up and burnt the edges off... then i rolled in the other direction and did the same thing. now i scrunched up the tissue paper and burnt sections... this gave it some holes in the middle of the paper, plus a real rough look. Once I opened up the tissue paper i burned a few more sections of the paper to make sure there weren't sections of the paper that were completely void of burns, then i laid the sheet out flat on a piece of black poster board and took a shot of the burned tissue paper.
I then imported that into Aperture and adjusted the black point such that the black poster board became completely black.

OK, so now we have an image... we have a texture... time to put them together.
Open up your base image in Photoshop (in this case, it is the angel) and then open up your texture image. Select all of the texture image and copy it to the clipboard. Now go back to the base image and create a new layer. Paste your texture onto this layer, then go to the free transform (in the edit menu) and then resize your texture image to lay over the complete base image (you should now not be able to see the base image).
Now, in the layer properties, choose to change the layer from "Normal" to "Overlay" (or soft light, or hard light, or whatever... time for you to experiment). In this case I did the Overlay and then i duplicated the layer to intensify the effect...
and that's it. That all it took (it's fairly easy, regardless of how difficult i may have made it sound).
Enjoy workin' with textures. (and make sure to go to this tutorial by aknacer. for the vid that showed me how to accomplish this).
Have a great weekend!
No comments:
Post a Comment