it's been a while since i blogged about a photo i've taken, but this seemed like the perfect opportunity to start back up...
as summer approaches in my neck of the woods my yard gets filled up with fireflies. The spectacle is kinda magical, and i wanted to try and capture that a bit for this photo.
So, I took 88 photos. which may seem like overkill to most of you, but here is why approached the shot this way.
I wanted to open up the aperture wide open (1.8) so I could capture as much of the flashes of light from the fireflies as possible. But with the aperture wide open I couldn't keep the exposure open very long without completely overexposing the shot. So to compensate for this issue, I took one base shot at 8 seconds f/1.8 (which is the picture that allows you to see the fence, tree, etc). next i took 87 shots at f/1.8 and 3 seconds... these are the shots that capture the fireflies.
I then imported the 88 shots into photoshop as a stack, and then set the stack mode to "Maximum". This would combine all the pictures by showing the brightest pixel available for that location in any of the 88 shots. And that is how I got the fireflies to show up.
The process takes a while (about 2 hours of processing tim on the mac), but at the end of the process, it worked out ok ;-)
Sunday, May 31, 2009


Friday, May 1, 2009
121/365 - A Walk To The Back
121/365 - A Walk To The Back
Originally uploaded by ddiemont
So, first things first, you need a lot of pictures... this is a combination of 883 pics at 12 pics/sec... So, I set my camera up to take a burst rate of about 3 frames per second and set it to the lowest resolution JPG it could take (no need for super high res RAW here)... Then I set a low aperture f/4 and focused to infinity (while setting the focus mode to manual).
The camera was then set to aperture priority (so it could adjust the shutter speed on the fly) and then i held down the shutter and started walking... my buffer will allow me to take about 130 shots or so before i had to stop for a moment.
Once I had gotten all the shots I then headed into the house and then imported the images as an image sequence in quicktime pro (Open > Image Sequence)... here you just navigate to the first image in the sequence and the rest will be imported in in order.
I then exported the movie and used iMovie to add some Muzaak and a little subtitle... and that's was it ;-)
Well, I'm off to pack for vacation. Thanks for stopping by ;-)
Thursday, April 23, 2009
113/365 - beer and wings
for those who haven't followed my antics, I'm a HUGE Red Wings Fan (actually, I'm a huge Detroit Sports Fan)... so tonight was the Detroit Red Wings 4th game of the playoffs and since I was headed out to have some drink while watching the game decided to take a shot of some "Wings and Beer" (obviously a play on buffalo wings and beer... yum).
So, first things first, take shots... i poured a glass of beer and got several shots of it in various states of beer headedness... for this shot i used one with no foam for the base layer and second shot take a few seconds earlier with a thin coating of head on the beer...
Now, open both those shots in photoshop and place the no foam version at the bottom layer... then i went online and found a red wings logo and imported that into the composition in it's own layer...
so, at this point i have 3 layers
- red wings logo on top
- beer with a lot of foam on the layer below that
- beer with little foam on the bottom later
ok, now select the logo and use the distortion feature (in photoshop it is under "Edit > Transform > Distort" to distort the perspective of the logo such that it appears as though it is laying atop the beer.
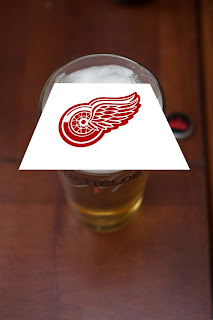
ok, now we've got the elements laid out the way we want them, we just want to get rid of that wacky looking logo atop the beer... so with that layer selected we do a color range selection (luckily the red wings logo is only red)... in photoshop it is "Select > Color Range..." this allows us to choose the red portions of the image... which essentially is the red wings logo. when in the color selection tool select the red from the image and adjust the fuzziness such that the logo is highlighted and not much else... then click ok and now you have your selection.
so, now we have the logo selected, it's time to start erasing some beer head... select your second layer and now your selection is going to apply to that layer... next i selected the eraser tool and set the opacity to about 20% and erased the entire logo...
The next thing i did was select the selection tool again and then open the "Refine Edges Dialog" and decreased the size of the selection by contracting it to about -30 or so... then selected the eraser tool, changed the opacity to about 70% and erased some the entire selected area...
saved and re-imported into aperture and added the vignette and did some work with levels (obviously i could have done this in CS3, but i've got a workflow in Aperture that I am MUCH faster with, so that is what I tend to work with for things that i know)...
and that's about it... sounds kind of intensive, but it really only took about 10 minutes to put all the pieces together. just took a bit of planning ahead of time and knowing exactly what i wanted to do ;-)
thanks for stopping by...
4 games down, 12 to go.
-Derrick

So, first things first, take shots... i poured a glass of beer and got several shots of it in various states of beer headedness... for this shot i used one with no foam for the base layer and second shot take a few seconds earlier with a thin coating of head on the beer...
Now, open both those shots in photoshop and place the no foam version at the bottom layer... then i went online and found a red wings logo and imported that into the composition in it's own layer...
so, at this point i have 3 layers
- red wings logo on top
- beer with a lot of foam on the layer below that
- beer with little foam on the bottom later
ok, now select the logo and use the distortion feature (in photoshop it is under "Edit > Transform > Distort" to distort the perspective of the logo such that it appears as though it is laying atop the beer.

ok, now we've got the elements laid out the way we want them, we just want to get rid of that wacky looking logo atop the beer... so with that layer selected we do a color range selection (luckily the red wings logo is only red)... in photoshop it is "Select > Color Range..." this allows us to choose the red portions of the image... which essentially is the red wings logo. when in the color selection tool select the red from the image and adjust the fuzziness such that the logo is highlighted and not much else... then click ok and now you have your selection.
so, now we have the logo selected, it's time to start erasing some beer head... select your second layer and now your selection is going to apply to that layer... next i selected the eraser tool and set the opacity to about 20% and erased the entire logo...
The next thing i did was select the selection tool again and then open the "Refine Edges Dialog" and decreased the size of the selection by contracting it to about -30 or so... then selected the eraser tool, changed the opacity to about 70% and erased some the entire selected area...
saved and re-imported into aperture and added the vignette and did some work with levels (obviously i could have done this in CS3, but i've got a workflow in Aperture that I am MUCH faster with, so that is what I tend to work with for things that i know)...
and that's about it... sounds kind of intensive, but it really only took about 10 minutes to put all the pieces together. just took a bit of planning ahead of time and knowing exactly what i wanted to do ;-)
thanks for stopping by...
4 games down, 12 to go.
-Derrick
Sunday, April 19, 2009
107/365 - the colors of spring
blah So early yesterday i was contemplating what my shot of the day was going to be... well, i picked up some metal pipes that were laying around my house in thoughts that i could build myself a new ghetto lightbox with them... well, didn't have enough pipe to make the lightbox, but I decided to pick them up and look through them. I can't quite tell you why I did, just an accident I suppose, but as I looked through the pipes I notices that the light refracted through each of the pipes differently when pointed at the same item.
So, now I had my photo idea for the day, I just needed to execute. So I took a couple of rubber bands and strapped the 6 pipes together and went outside to start looking through them for some cool colors. I eventually ended up in front of some Wisteria and found the colors to be perfect. I set the pipes up on the boat in the yard and started shooting (see picture below).
Just in case you are looking to reproduce, the pipes were about 1" in diameter and about 2 feet long. I'm not quite sure what they are from though...
So that's about it. nothing terribly special, just some pretty colors ;-)
Thanks for stopping by
-Derrick
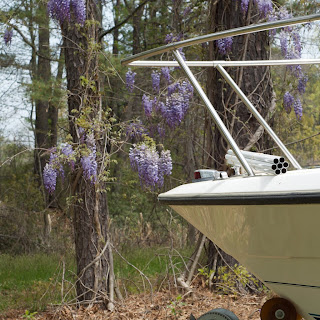

So, now I had my photo idea for the day, I just needed to execute. So I took a couple of rubber bands and strapped the 6 pipes together and went outside to start looking through them for some cool colors. I eventually ended up in front of some Wisteria and found the colors to be perfect. I set the pipes up on the boat in the yard and started shooting (see picture below).
Just in case you are looking to reproduce, the pipes were about 1" in diameter and about 2 feet long. I'm not quite sure what they are from though...
So that's about it. nothing terribly special, just some pretty colors ;-)
Thanks for stopping by
-Derrick

Saturday, April 11, 2009
101/365 - the escape plan
It's been a while and I'm back!!! So today we are going to discuss how to do a ghetto macro lens. Be forewarned... this is crazy... I am a professional driver on a closed course ;-)
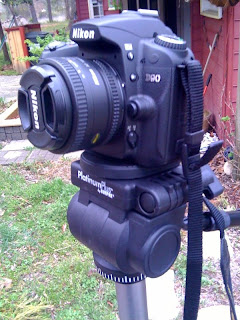
This is pretty simple stuff, but a real pain without the proper equipment (which i do not have). Basically what you are going to want to do is to take your camera, mount it on a tripod (for some semblance of steadiness) and then mount your 50mm lens onto the camera backwards... well, that is if you have a reversing ring, for nikon's it is a BR-2A, this is an accessory that will allow you to mount your 50mm lens backwards onto your camera, effectively turning it into a macro lens... I, in this case, just held the lens in front of the camera... truly ghetto.
so there must be a catch right??? otherwise no one would ever buy a macro lens. well, there are several catches... this is a completely manual solution, so a lot of trial and error will be part of your photo shoot. this is because your camera can't meter without a lens attached (and essentially you aren't mounting the lens... even with the Br-2A). So you will have to adjust the iso, shutter speed and aperture manually). there doesn't appear to be a way to adjust the focus when the camera is reverse mounted as well, so you will have to move the camera to adjust for this.
So, what I did for this shot was reversed the 50mm, and then started shooting the dandelion which was taped to a piece of black posterboard... bumped up the iso to 800 to allow for a faster shutter speed and then took about 10 shots with the timer shooting mode so i could get as steady as possible. then brought the shot into aperture and cropped slightly, adjusted the exposure, and then converted to monochrome using the green filter.
that's it... so what did i learn??? i learned it is time to get a real macro lens. i really like getting up close to items and this allows you to do just that. so i think know what my next photo purchase will be ;-)
thanks for stopping by.
-derrick
before flipping the lens:
after flipping the lens:
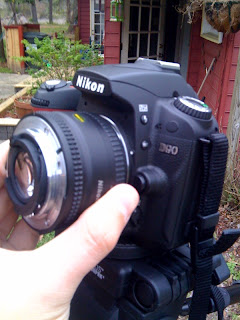

This is pretty simple stuff, but a real pain without the proper equipment (which i do not have). Basically what you are going to want to do is to take your camera, mount it on a tripod (for some semblance of steadiness) and then mount your 50mm lens onto the camera backwards... well, that is if you have a reversing ring, for nikon's it is a BR-2A, this is an accessory that will allow you to mount your 50mm lens backwards onto your camera, effectively turning it into a macro lens... I, in this case, just held the lens in front of the camera... truly ghetto.
so there must be a catch right??? otherwise no one would ever buy a macro lens. well, there are several catches... this is a completely manual solution, so a lot of trial and error will be part of your photo shoot. this is because your camera can't meter without a lens attached (and essentially you aren't mounting the lens... even with the Br-2A). So you will have to adjust the iso, shutter speed and aperture manually). there doesn't appear to be a way to adjust the focus when the camera is reverse mounted as well, so you will have to move the camera to adjust for this.
So, what I did for this shot was reversed the 50mm, and then started shooting the dandelion which was taped to a piece of black posterboard... bumped up the iso to 800 to allow for a faster shutter speed and then took about 10 shots with the timer shooting mode so i could get as steady as possible. then brought the shot into aperture and cropped slightly, adjusted the exposure, and then converted to monochrome using the green filter.
that's it... so what did i learn??? i learned it is time to get a real macro lens. i really like getting up close to items and this allows you to do just that. so i think know what my next photo purchase will be ;-)
thanks for stopping by.
-derrick
before flipping the lens:

after flipping the lens:

Friday, March 27, 2009
86/365 - Escher No. 2
So this was my second attempt at recreating a M.C. Escher classic. I was always drawn to his art as a child because his art involved math and I was very into math as a child as well... Add to that the fact that he is Dutch and I'm part Dutch, and you've got a winning combination.
So last night I picked up one of these Bamboo Tablets and it seemed like the perfect subject for this type of shot. I wanted to replicate Escher's famous drawing of a hand drawing a hand, which is drawing the hand that is drawing it... and hold up, i'm getting confused.
So here is how this one is accomplished. This is essentially a combination of 2 shots... the background image is of the Bamboo tablet with me drawing on it. The second shot I used was of my hand over a piece of black poster board in the exact opposite direction... if you really wanted to I suppose you could use the same shot as the original, rotate it 180 degrees, but then your lighting is going to be WAYYY off. (well, 180 degrees off).
So now you have the 2 pics to bring into photoshop. (well i brought them into aperture first to correct some white balance issues, etc.) So as the background layer I use the bamboo shot. Next I copied the hand from the other shot (using the quick selection tool and some edge refinement) and I pasted that into its own layer in the bamboo shot.... Next I transformed the hand that would be coming out of the bamboo such that it was the proper size and rotation and positioned properly.
Next I took the eraser tool, and erased off the excess pieces of my arm in the arm/hand only shot, such that it ended just before the edge of the tablet's "active area". Once this was done I took the brush tool, turned the opacity to 50, gave it a pretty low hardness value and created a shadow under my arm and hand. I mad the shadow come out a little more the further I got to the right to give a greater sense of depth.
Next I created a gradient mask over my arm so it disappeared into tablet (while on the layer, choose the add a mask and create a gradient on that layer which fades from the start of the shadow area to the edge of the pad.
next I took the Pen tip in the Bamboo shot and copied and pasted into a new top level layer. this way the pen tip on the regular shot appears to be on top of the "drawing of my arm"
and finally, take the arm/hand layer and apply a "reticulation" filter to it. This is what gives the arm coming out of the tablet a "pointillism" feel... which is a nod to m.c. escher.
thanks for stoppin by,
Derrick

So last night I picked up one of these Bamboo Tablets and it seemed like the perfect subject for this type of shot. I wanted to replicate Escher's famous drawing of a hand drawing a hand, which is drawing the hand that is drawing it... and hold up, i'm getting confused.
So here is how this one is accomplished. This is essentially a combination of 2 shots... the background image is of the Bamboo tablet with me drawing on it. The second shot I used was of my hand over a piece of black poster board in the exact opposite direction... if you really wanted to I suppose you could use the same shot as the original, rotate it 180 degrees, but then your lighting is going to be WAYYY off. (well, 180 degrees off).
So now you have the 2 pics to bring into photoshop. (well i brought them into aperture first to correct some white balance issues, etc.) So as the background layer I use the bamboo shot. Next I copied the hand from the other shot (using the quick selection tool and some edge refinement) and I pasted that into its own layer in the bamboo shot.... Next I transformed the hand that would be coming out of the bamboo such that it was the proper size and rotation and positioned properly.
Next I took the eraser tool, and erased off the excess pieces of my arm in the arm/hand only shot, such that it ended just before the edge of the tablet's "active area". Once this was done I took the brush tool, turned the opacity to 50, gave it a pretty low hardness value and created a shadow under my arm and hand. I mad the shadow come out a little more the further I got to the right to give a greater sense of depth.
Next I created a gradient mask over my arm so it disappeared into tablet (while on the layer, choose the add a mask and create a gradient on that layer which fades from the start of the shadow area to the edge of the pad.
next I took the Pen tip in the Bamboo shot and copied and pasted into a new top level layer. this way the pen tip on the regular shot appears to be on top of the "drawing of my arm"
and finally, take the arm/hand layer and apply a "reticulation" filter to it. This is what gives the arm coming out of the tablet a "pointillism" feel... which is a nod to m.c. escher.
thanks for stoppin by,
Derrick
83/365 - the diver
so there goes one perfectly good piece of posterboard...
the original idea for this shot was that it was going to be a diptych (or maybe more than 2 shots) to shot the diver jumping off the diving board and into the cup of water. in the end i felt like it worked pretty well as a single shot... so here is how it's done.
First things first... draw all the background elements onto your ghetto lightbox (don't sweat it, posterboard is like $0.79). i would suggest drawing in pencil first and then going over top of that with a sharpie or something dark.
now it's time to light up your lightbox and take your first shot. better throw the cam on a tripod and trigger with a remote at this point because we want minimal movement between the shots... my first shot was set at f/14, 1/6sec exposure at 200 ISO (all shots were taken with my 50mm lens). The main purpose of this shot is to get the stick man's image as he is diving into the water...
The second shot is same type shot, but now with the glass of water in place (water had 2 drops of food coloring in it for dramatic effect). same camera settings for this shot as the last one, focused on the rim of the glass this time.
Now it's time to start droping objects into the water for the splash... this is a combination of camera settings, timing, and luck. The camera settings for this shot were (f/2, 1/800sec, ISO 640). Then I started dropping coins into the water and getting shots... the 6th or 7th shot turned out the best (hence the puddles of blue water on the base of the posterboard).
Now, clean up the mess you've made and head over to the computer. I imported the shots into Aperture and adjusted white balance and exposure such that the shots matched. I then exported the three shots into photoshop. The base layer being drawings along, the next being the glass sans splash, and the top layer being the splash. I made sure all the shots were lined up properly and then started doing some erasing. If I knew then what I know now, I would have probably tried to accomplish this with masks... I made sure to put a bit of a soft edge on the eraser so that it wouldn't look to harsh in the transition areas.
once i had everything looking ok, i did some blurring on the diving board to give it a sense of motion... then brought the shot back into aperture for some final touch up work, then posted to fickr... so there ya go... not so bad, just takes a bit o' planning ;-)
thanks for stopping by,
Derrick

the original idea for this shot was that it was going to be a diptych (or maybe more than 2 shots) to shot the diver jumping off the diving board and into the cup of water. in the end i felt like it worked pretty well as a single shot... so here is how it's done.
First things first... draw all the background elements onto your ghetto lightbox (don't sweat it, posterboard is like $0.79). i would suggest drawing in pencil first and then going over top of that with a sharpie or something dark.
now it's time to light up your lightbox and take your first shot. better throw the cam on a tripod and trigger with a remote at this point because we want minimal movement between the shots... my first shot was set at f/14, 1/6sec exposure at 200 ISO (all shots were taken with my 50mm lens). The main purpose of this shot is to get the stick man's image as he is diving into the water...
The second shot is same type shot, but now with the glass of water in place (water had 2 drops of food coloring in it for dramatic effect). same camera settings for this shot as the last one, focused on the rim of the glass this time.
Now it's time to start droping objects into the water for the splash... this is a combination of camera settings, timing, and luck. The camera settings for this shot were (f/2, 1/800sec, ISO 640). Then I started dropping coins into the water and getting shots... the 6th or 7th shot turned out the best (hence the puddles of blue water on the base of the posterboard).
Now, clean up the mess you've made and head over to the computer. I imported the shots into Aperture and adjusted white balance and exposure such that the shots matched. I then exported the three shots into photoshop. The base layer being drawings along, the next being the glass sans splash, and the top layer being the splash. I made sure all the shots were lined up properly and then started doing some erasing. If I knew then what I know now, I would have probably tried to accomplish this with masks... I made sure to put a bit of a soft edge on the eraser so that it wouldn't look to harsh in the transition areas.
once i had everything looking ok, i did some blurring on the diving board to give it a sense of motion... then brought the shot back into aperture for some final touch up work, then posted to fickr... so there ya go... not so bad, just takes a bit o' planning ;-)
thanks for stopping by,
Derrick
Subscribe to:
Posts (Atom)